What Is Concrete Repair?
Commercial Concrete Contractors Dallas TX involves a condition evaluation to determine the causes of deterioration and select suitable repair methods and materials. It also involves a thorough inspection of the structure.
One of the most popular concrete repair methods is routing and sealing. This is particularly effective for dormant cracks.
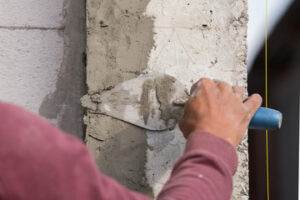
For concrete repair to succeed, the damage must be properly evaluated. This includes determining the nature of the problem and its severity, identifying causes of failure, and selecting a suitable solution. For major structural repairs (fractured floors, walls, and other extensive damage), contact a professional engineer for advice is often necessary.
When a problem is identified, the first step in the repair process is to clean the area thoroughly, ensuring all loose debris is removed. This is also an opportunity to identify delaminated areas, usually indicated by a hollow sound when tapped with a hammer. Delaminated concrete sections will not have the hard ring characteristic of sound concrete and should be removed as a precaution against future spalling.
The next decision is what type of repair material is to be used. Many different types of repair materials are on the market today, each with unique characteristics. A good choice for most repairs will be a concrete repair mortar that contains both cement and an aggregate mixture with a polymer added to create a higher bond strength. Most commercial concrete repair mortars on the market are also freeze-thaw resistant, highly durable, and able to withstand various service conditions.
Another factor to consider is the crack size or area to be repaired. A concrete repair mortar that can be forced into the crack with a putty knife or mason’s trowel is ideal for small cracks. This will ensure the concrete is firmly packed into the crack, eliminating the possibility of recurrence.
Larger cracks or voids may require an epoxy resin or latex patching product mixed according to the manufacturer’s specifications and applied with a cartridge gun. For best results, the repair area should be slightly dampened before applying the material, and a putty knife or mason’s knife should be used to force the material into the cracks and voids, ensuring that all air pockets are filled. Once the patch has been applied, it should be misted with water to keep it moist until cured.
The repair material needed for concrete damage must be compatible with the damaged concrete, have sufficient strength to hold up to the stresses caused by the structural movement of the cracks and other damage, be capable of withstanding the exposure conditions to which the repaired structure is subjected, and be suitable for the type of work involved. The cost of the materials should also be considered, as it will affect the final costs of the repairs.
Many different types of materials are used for concrete repair. Unmodified Portland cement mortar or grout, latex-modified Portland cement mortar or grout, quick-setting nonshrink mortar, and polymer concrete are some of the most common repair materials. Each has advantages and disadvantages, depending on the type and condition of the concrete being repaired.
Epoxy is a popular repair material for concrete structures, including floors and walls. Its nonshrink properties make it an excellent choice for the repair of cracks in concrete. It also has high compressive and tensile strengths. It can be used to repair cracks in both concrete and masonry.
Other repair methods include routing and sealing. This method involves drilling a hole along the length of a crack and then filling it with grout. This creates a grout key, which locks the crack and prevents additional movement of nearby concrete sections. Another option is a prestressing system, which uses cables or bars that apply extra force to the cracks to reduce their movement.
There are also products designed specifically for vertical and overhead concrete repairs. These are great for repairing concrete surfaces constantly exposed to moisture and other environmental factors. They are typically fast to set, easy to use, and provide superior adhesion and durability.
Other repair products include concrete patch mixes and sprayable cement. These are ideal for patching holes and cracks in concrete pavement and industrial floors. These are often available in low-slump formulations to help with surface leveling and to produce a high-strength, durable repair. They can also be used to repair deteriorated stucco.
A concrete repair procedure must consider all factors governing the deterioration and damage of the structure. It should stall or reverse the degradation, preventing it from progressing to structural failure. It should also be cost-effective, ensuring a structure’s expected durability is achieved quickly.
The first step in repairing concrete is to identify the cause of the damage. Then, the appropriate procedures can be implemented to address the problem. In many cases, this will involve breaking away a small section of the damaged concrete and conducting tests to find the source of the damage. This can be done using destructive or nondestructive evaluation techniques like radar, infrared thermography, and impact-echo testing.
Once the cause of the deterioration is identified, the next step in repairing concrete involves cleaning the surface. Concrete cleaning can be performed using wire brushes, power washers, or brooms to remove dirt and grime embedded in the concrete over time. A thorough cleaning must be completed, as any hollow or loose areas within the concrete could lead to long-term problems.
After cleaning the concrete, a bonding agent can be applied to the surface. This improves the adhesion of the new concrete to the existing concrete, preventing the repair from becoming loose or cracking. Several bonding agents, including epoxy, polyurethane, and cement-based products, are available.
A repair material can be poured once a bonding agent is applied to the surface. This may be a polymer, epoxy, or a cement product that contains a special additive to improve the adhesion. When a cement product is used, the proper mix must be selected for the application. It must be compatible with the existing concrete and contain enough compressive strength to replace the original material in the damaged area.
Another important factor to consider in choosing a repair material is its ability to handle thermal expansion and contraction. Typically, concrete repair materials should have a lower coefficient of thermal expansion than the concrete to which they will be applied. This will help to prevent cracking and delamination of the repair material in a freeze-thaw environment.
Concrete is a durable material, but it does show signs of wear and tear over time. It’s important to inspect the damage and determine what caused it to prevent future occurrences. It’s also important to ensure the right materials are used for the repair and mixed correctly. Incorrect mixing or pouring could lead to a weaker, more vulnerable concrete structure.
While there are many reasons why concrete can fail, a few of the main problems include temperature changes and movement, water and chemical damage, and improper installation. A skilled concrete restoration expert can diagnose the problem and recommend the correct repair methods.
The most common method of concrete repair involves epoxy and urethane injections. These injections are a quick, affordable, and effective solution for repairing cracks in concrete. Many contractors use them, and they can be a great choice for your project. These injections will not only fix the problem but also help strengthen the concrete to ensure it lasts longer.
Another popular technique for concrete repair is shotcrete. This process is ideal for large projects and is often recommended by concrete experts, including those at CMR. This repair method requires a high level of skill and knowledge, but it is an effective way to repair concrete quickly and efficiently.
When deciding on concrete repair, it’s important to understand the different types of materials and how they work together. A skilled contractor can recommend the best materials for your job and create a custom plan to fit your needs. Using the right materials will ensure your project is completed on time and budget.
In addition to repairing structural concrete, it is important to consider other options, such as coatings and overlays. These products can help extend the life of concrete and protect it from chemicals and water. They can be applied to various surfaces, such as plaza decks, water treatment plants, and bridges.
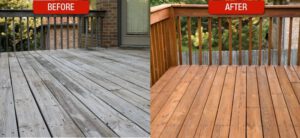
How to Fix Common Deck Repair Problems
Deck Repair Charleston SC is often an inevitable part of owning a home. Weather damage, rock salt used to melt ice in the winter, and general wear and tear can all affect the appearance and safety of your deck.
If there is rot in weight-bearing posts or beams, this will cost more to fix than surface rotting on planks. A professional should inspect these areas before attempting any repairs.
Water damage can be a major problem for a deck. It can saturate the wood, weakening it and making it more susceptible to warping, splitting, mold growth, and other issues. It can also cause rot and termite problems.
The first step in repairing water damage is to find the source of the problem. This can be difficult, especially if you have a large number of boards. Start by checking the joists underneath the damaged board. If you see rot or other signs of moisture, remove the board and treat and protect the exposed joists.
Once the rot is taken care of, you can reseal the deck to protect it from future damage. You can choose to use a clear finish or a transparent stain. A semi-transparent stain is commonly recommended because it adds color while letting the grain of the wood show through.
After a few years, decks will lose their natural color due to exposure, wear and tear, and debris like stray leaves. Staining the deck can restore some of its color, and it will protect the deck from moisture damage and other potential problems.
Whether you choose to use a clear finish or sand and stain the deck, it is important to reseal it every year. This will help prevent water damage, which is the most common cause of deck failure.
If you have a lot of surface dirt and grime on your deck, wash it using a mild detergent solution and rinse thoroughly. Then sand the deck with a power sander or hand sander with 50-grit paper, making sure to sand with the grain.
Decks often have a railing or baluster that is loose, which can create a trip hazard. Loose railings can also allow water to penetrate the wood and cause rot. Repairing loose railings and securing loose balusters can improve safety and extend the life of the deck.
If you decide to replace a deck board, take a sample of the old and new boards with you to the lumberyard or hardware store so that you can match the color. This can be a time-consuming, but important step in getting your deck looking good as new again.
A deck that sits in the rain for too long or is covered with water for an extended period of time can experience mildew. This fungus can cause the wood to become soft and spongy, which will weaken it. Mildew is usually white or gray in color but can turn yellowish brown with age. It tends to grow on surfaces that are moist and warm.
It can also grow on fabrics, such as a towel that has been hung over a railing or a damp shower curtain left bunched up against the wall of a tub or the back of a door. Mildew is easy to remove with store-bought cleaners, but it’s important to get rid of the cause of the spores, too. Otherwise, the problem will just return.
Using a garden hose, wash your deck thoroughly and rinse it well to remove all soapy residues. Once the deck is dry, you can touch it up with a coat of CUTEK.
Mold and mildew both love warm, moist areas and can grow on a variety of items, from food to shower walls to regular old paper. They can also cause a range of health issues, including coughing, sore throats and respiratory problems in those with preexisting conditions.
One of the easiest ways to tell the difference between mold and mildew is by appearance and odor. Mold is typically black or dark green, fuzzy, and often grows in grotesque, raised shapes. Mildew is typically white, gray or yellow and has a powdery texture. It can sometimes grow in grotesque, raised shapes, but it is much less common than mold. It also has a musty scent that can be difficult to get rid of.
Both can be treated with a store-bought cleaner and a scrub brush, but mold is more difficult to get rid of than mildew. It’s especially important to keep fabrics as dry as possible, which is why it’s important to clean mildew-stained fabric immediately. If the stain has already gotten into the fibers of a fabric, it’s best to cut it out and toss the material.
A sagging deck is not only unsightly, but it can also be dangerous. If your deck sags more than a few inches in some places, it is likely to cause the ledger board (the long pressure-treated wood piece that attaches your deck to the house) to pull away from the house or even fall off. It’s possible to repair this problem on a DIY basis, but you should consult a professional if the damage is severe or extensive.
If your deck has a slight sag, try sanding the joists to help level them. You can do this with a power sander fitted with a fine-grit screen. You can also use a bar clamp or Deck Devil to apply pressure and pull up on the joists. If your joists are damaged, you may need to replace them. Joists can become bowed due to water damage, rot or insect damage, and rusted nails, screws or connections.
You should also inspect your deck for rotted posts. If you see signs of wood-eating pests on or around your deck, you should have them exterminated right away. These pests include termites, carpenter ants and woodpeckers. Insects like to eat away at wood, and if left unchecked can destroy the frame of your deck.
Most decks have large horizontal beams that rest on top of the support piers or posts and support the floor joists. Inspect these beams for severe cracks and water damage. You should also make sure that the beams are firmly attached to the piers or posts. If you can poke a finger into the beam and feel spongy wood fibers, you have serious rot and should replace it.
It is also important to make sure that the posts are firmly attached to the concrete footings. Posts that sit on the ground are more prone to sinking, especially in clay soils. The best way to prevent this is to either wait until the soil settles or dig the footings deeper to a solid, compacted layer of earth. This will prevent the sinking that can lead to deck failure.
When wood dries out, it shrinks and can leave the deck boards looking warped. This is a very common issue with wooden decks and can be easily fixed. Using the right technique, you can get your deck back to looking like new.
Decks are a beautiful addition to any home, but they also require regular care and maintenance. Without proper maintenance, they can develop problems that can lead to serious damage and deterioration of the structure. These issues range from mild to severe and can affect the appearance of your deck and the structural integrity of your home.
One of the most common causes of a deck collapse is that it has lost its structural integrity due to water damage. When a deck is properly constructed and maintained, it is designed to hold a large amount of weight without failing. However, if the structure has experienced serious water damage, it will start to sag and bow, which can cause significant safety risks for anyone who is using the deck.
If a deck is experiencing serious sagging and bowing, it is important to call in a professional to assess the situation and offer a solution. The professional can inspect the structure and determine if it is safe to use or if it will need to be replaced altogether.
Often, warped boards can be easily repaired by unscrewing them and flipping them over to create a smooth surface on the underside. It is then recommended to screw the boards back into place, making sure that there are screws every 4-6 inches on each side of the board. This will prevent the board from shifting again in the future.
Another way to prevent warping is to seal the ends of the deck boards. This will prevent moisture from being able to escape the sides of the boards, which can cause them to dry at different rates and lead to warping.
It is also important to check the footings of a deck on a regular basis. The footings are concrete pads that are installed under the deck posts to support the structure. If these are showing signs of cracking or discoloration, it is important to take action before the problem worsens.
Residential Roofers
When a roof is damaged, it needs to be replaced or repaired. Trying to do this yourself is a complex and potentially dangerous task that should be left to professionals.
Roofers perform regular inspections and can repair any problems they find. This will help to prevent expensive damage and ensure the longevity of your roof.
When you are looking at a house to purchase, you should have the roof of the property inspected by a residential Roofers. It is a good idea to do this before you buy it, because you will be able to know whether or not it has any problems that you need to take care of. In addition, you will also be able to make sure that the roof is up to code and in good condition.
A professional will conduct a complete inspection of the roof and its components, including the shingles, roof decking, fascia, and rafters. He will also look for signs of water damage, such as rotting or mold. He will also inspect the chimney, skylights, and vents to make sure they are in good working order. He will also examine the flashing, which are strips of metal or plastic that are used to divert rainwater away from a penetration point in a roof.
He will check the shingles for cracks, curling, or missing pieces. He will also examine the gutters to see if they are clogged and whether or not they drain properly. He will also survey the eaves and overhangs to make sure that they are in good condition. He will also check the attic for proper ventilation and insulation, as well as checking for signs of condensation or wet insulation. He will also examine any penetrations on the roof, such as vent pipes, TV antennas, or other installations. He will then assess the condition of the penetration seals and the flashing, and he will recommend any necessary repairs.
While a homeowner can do some of these things himself, a professional will be able to do a more thorough job. He will be able to find small problems that can lead to major issues in the future. He will be able to spot a problem with the shingle installation, and he can also spot any other problems that may lead to leaks or rot.
A professional will also be able to give you an estimate for the cost of any required repairs. This can be a huge help, as it will allow you to budget for the expense of a new roof. He will also be able to tell you how long the roof is expected to last, based on the type of material that it is made from.
Repairing
Residential Roofers repair and maintain roofs on houses, apartments, condos, and other types of residential dwellings. They typically use ladders or scaffolding to access the rooftop, and they must be mindful of property lines and safety issues while working on the home’s roof. They may also interact with homeowners to discuss project details and address concerns.
When repairing a leaky roof, the first step is to determine the cause of the problem. Leaks can result from a variety of issues, including poor ventilation, shingle damage, and structural damage. Some of these problems can be fixed by a qualified roofer, while others require more extensive repairs.
The next step is to assess the situation and determine whether it’s an emergency or not. A roof that’s at risk of collapse, a large hole in the roof, or major water damage are all considered emergencies and should be repaired immediately.
If the damage to the roof isn’t an emergency, the roofer will begin the process of repairing it. They’ll first tarp the roof to prevent further damage, and then they’ll work to repair any leaks or other problems. They’ll also clean the roof and gutters, replace damaged shingles, and fix loose or missing flashing around chimneys and other roof features.
During the repairing process, it’s important to keep children and pets away from the area. Anything that could fall off the roof during the repair process, such as nails or debris, can hurt them. It’s also a good idea to move any patio furniture, yard decorations, or other items that are close to the roof.
Residential roofs are often exposed to a variety of weather conditions, which can affect the longevity of the roof and lead to leaks and other problems. Hot and humid climate can cause asphalt shingles to lose their protective granules, while severe storms and hurricanes can damage the roof structure.
Regular maintenance and inspections by a licensed roofer can help to reduce the need for costly repairs in the future. During these inspections, the roofer will look for any signs of aging or weather damage. They can then recommend any recommended maintenance tasks and provide a detailed estimate for the repair work.
Fitting
Roofers must be skilled in properly aligning and attaching shingles to create a watertight and aesthetically pleasing roof. They also need to have knowledge of a variety of roofing materials and installation techniques, including the use of insulation, flashing, and venting. Additionally, they should be able to communicate with customers to discuss their roofing needs and answer any questions or concerns.
Residential Roofers work on a wide variety of roofs, including flat and pitched systems. They can install, repair, and replace shingle and tile roofs, as well as provide maintenance for various types of roofs. Some specialize in certain roofing systems, such as metal or green roofs. Others may work on specific types of homes, such as new construction or older multi-family dwellings.
Unlike other home renovation projects, roofing repairs and replacements must be completed quickly. This is because the roof protects the interior of a building, and a leaky or damaged roof can cause water damage, mold, mildew, rot, and structural problems. Moreover, roofs often need to be inspected and repaired after severe storms.
The best way to find a good residential roofer is by asking for recommendations from family, friends, and neighbors. Ideally, you should choose a roofer who has a strong reputation in your area and has extensive experience with different types of roofing. In addition, you should check their credentials and insurance coverage. Many local governments have databases that allow you to search for licensed contractors.
When hiring a roofing contractor, it’s important to make sure that they are insured, licensed, and qualified to perform the job. If they cannot provide you with proof of liability and workers’ compensation, you should look elsewhere. It’s also a good idea to check the roofer’s online reputation and read real customer testimonials.
Before the roofers arrive, you should clear your outdoor toys and move any furniture that could be harmed by falling shingles. You should also mark any especially delicate or expensive plants, and cover them with tarps or netting. It is also a good idea to have your children stay with grandparents or a friend while the roofers are working. This will prevent them from being exposed to dangerous chemicals or debris and allow them to sleep comfortably during roofing.
Materials Used in Retaining Walls
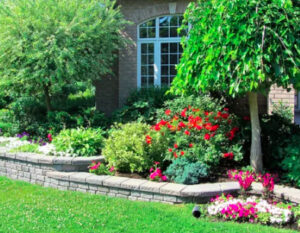 Retaining Walls Charleston SC can combat erosion and help you get the most out of your property. They also protect your lawn and landscape from floods, heavy rains, strong winds and other natural occurrences that cause soil erosion.
Retaining walls can be made of many different materials. You can build a retaining wall yourself with the right tools, but we recommend leaving it to professionals for any significant height or design.
Retaining walls can be built with a wide variety of materials. Some, like concrete block walls, can be DIY projects, while others require professional expertise. The choice depends on design tastes and the purpose of the wall.
A retaining wall can help solve a site problem, add usable space or create a dramatic landscape feature. But a well-designed and constructed retaining wall is more than just functional; it adds value to your property.
Concrete retaining walls can be moderately challenging to build up to four feet tall for a do-it-yourselfer with good building skills. Choose blocks that are specifically designed for retaining walls, with a locking flange along the back of each unit to ensure they fit together without mortar. Look for them at your local stone yard and home improvement store. The blocks come in a range of gray and earthy hues, with textured or smooth faces, to suit any design aesthetic.
For a more natural appearance, consider a dry-laid stone or timber retaining wall. These walls can blend seamlessly into any landscaping project and are more environmentally friendly than a poured concrete wall, which can be harder on the environment and less adaptable to changing weather conditions.
A gravity retaining wall, which rests on a bed of crushed rock or gravel, is another option for homeowners. To protect the soil behind the wall, use a layer of landscape fabric and install drainage to carry runoff water away from the base of the wall.
For a long-lasting and stylish retaining wall, choose a system that incorporates concrete block, natural stone or brick. These are the most durable and versatile choices. If you’re designing a very tall retaining wall, consult with a professional engineer and be sure to follow all local building codes.
Poured Concrete
Concrete is extremely strong, which is important for retaining walls that keep back tons of earth. They are also very durable, able to last for decades with minimal maintenance. However, poured concrete is expensive because it requires extensive labor and materials. Local regulations, building codes and taxes all affect regional pricing. Concrete is also heavier than other retaining wall construction methods, which can make it more difficult to build on slopes and require special equipment such as cranes.
Poured concrete is a great choice for homeowners who wish to create a retaining wall with a modern look. They can be colored, stamped or accented with embedded objects. This type of retaining wall can be very attractive when paired with other hardscape elements such as water features, trees or shrubs.
For a more rustic look, a poured concrete wall can be built with an exposed aggregate finish. This is done by combining the concrete with pebbles or other decorative aggregate before it sets. This gives the wall a unique texture that is beautiful and functional, especially for steps or a garden area.
If you choose to use a poured concrete foundation for your retaining wall, be sure to lay the footings first and then pour the concrete. This will prevent the wall from collapsing into the ground. Concrete that is poured in place has more strength than block foundations and can withstand more lateral soil pressure. It’s a good idea to engage an engineer for any retaining wall over three feet in height.
Brick is another time-honored material for retaining walls that can be used to create a unique style. It’s a labor-intensive process, but can produce a beautiful, sturdy wall that can match the architectural elements of any house. Brick is less prone to leaks than other types of retaining walls, but must be designed with drainage in mind.
Wood
Wood retaining walls are a natural choice, blending into the landscape with tree and shrub plantings. They can rise to a maximum of four feet and offer many design options. Although they may not have the strength and rigidity of poured concrete or other materials, a well-designed timber wall is very stable. In addition, they are relatively affordable and easy to install. However, they are susceptible to water damage and rot and require regular staining or painting.
If you choose to go with a wood retaining wall, ensure it is pressure treated. This will make it rot resistant and last much longer than untreated wood. Also, ensure the contractor you work with is experienced in constructing timber retaining walls. If a timber retaining wall is not constructed properly, it can quickly become unsafe and may cause soil erosion.
When constructing a wood retaining wall, the first step is to excavate the site. Ensure the area is free of rocks, refuse, and any plants that could be pulled up during construction. Then, dig a trench to backfill the wall. If a drainage system is required, it should be installed at this point as well. Finally, a layer of plywood should be put down to protect your driveway and any other valuable landscaping from the excavating equipment.
The next step is to construct the timber wall itself. Large timbers are usually used, but railroad ties are also an alternative. The best kind of lumber for a timber retaining wall is Douglas fir that has been pressure treated with preservatives to discourage rot. It should be green or brown in color and rated for wood-to-ground contact. When constructing the timber walls, be sure to stagger each row with a 1/2-inch setback from the previous one. This will dramatically improve the stability of the retaining wall.
Stone
Stone is one of the most popular materials to use in retaining walls for both aesthetic and practical reasons. These walls are great for preventing soil erosion, providing a place to grow planters and creating focal points in gardens or yards. They are also a popular option for country, colonial and English garden-style landscaping.
These types of walls are typically dry-stacked, meaning that they are built without the use of mortar to hold the stones together. They are more labor intensive than other wall construction methods, but they can be very beautiful and add a sense of character to your home. They can be stacked in various ways to create unique shapes and designs for your retaining wall.
Before you begin building your retaining wall, make sure that you have the proper tools and equipment to complete the job. It is recommended that you plan ahead and make a list of the materials that you will need. This will help you to avoid overspending on the project and will keep your project on time and within budget.
When you’re ready to start building, dig a trench where you want your retaining wall to go. The trench should be a few inches below ground level and as wide as the rocks or stones that you’ll be using for the foundation.
It’s important to backfill the area behind your retaining wall with pea-sized gravel to provide support and stability to the structure. It is important that you do this in stages and not all at once to prevent shifting or sinking as the backfill settles. It’s also a good idea to add landscaping fabric as you backfill to help keep water away from the wall and promote proper drainage.
Brick
Brick is a time-honored building material that has served many purposes over the years. It is durable, strong and attractive to look at. A brick retaining wall will provide a timeless addition to any landscaping project. However, it can be very labor intensive and requires the skills of a mason or landscaper to lay correctly.
Like other types of retaining walls, brick ones are built to resist the horizontal – or lateral – earth pressure exerted on them by the material they retain. To do this, they need to restrain the engineer fill material at an angle steeper than its natural “angle of repose.”
A properly constructed brick retaining wall will last for decades or even centuries, depending on the soil conditions around it. But it is important that the design and construction process follow local and state guidelines for these structures.
The first step is to build a proper foundation. This is done by spreading a 2-inch layer of sand or gravel over the area where the first row of blocks will be placed. This base layer is then compacted using a hand tamper to ensure it is flat and level.
After tamping, the block layers can begin to be laid in the desired pattern. Most of the bricks in each course will be full size blocks, but half-size end bricks can also be used to reduce the amount of mortar that needs to be applied at the ends of each row. This technique is called a running bond and allows for a more even and stronger retaining wall than one with all full-size end blocks in every course.
When the wall reaches its final height, it is finished with a row of coping bricks that act as a cap and help prevent rainwater from penetrating the wall and potentially damaging the underlying earth. This last row can be topped with a variety of different materials, such as stone, timber or concrete.
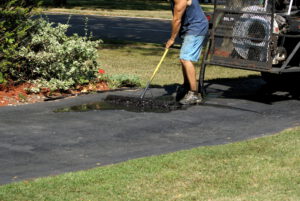
How Driveway Repair Can Help Extend the Lifespan of Your Driveway
Your driveway is a major investment. Regular maintenance and repairs can extend its lifespan, delaying the need to replace it.
Professional contractors like Paving Companies Charleston SC have the tools and equipment to perform the most effective repairs. They can also provide expert advice. Ask about the materials and techniques they plan to use for long-lasting results.
It is normal for concrete and asphalt driveways to develop cracks over time. But it’s important to address them as soon as you can before they get worse. Often, cracks indicate underlying issues, such as poor drainage, soil settlement, or inadequate pavement thickness. Wide cracks can also lead to water or ice seepage, further damaging the surface.
Hairline cracks are usually not a big deal, but they should be repaired soon because they can grow wider over time. It’s also a good idea to repair any cracks that are wider than the width of your credit card because they can be a tripping hazard and allow debris and dirt to enter the surface.
Wide cracks are caused by pressure and expansion from heavy vehicles driving over the surface or by ground movement. They can be more difficult to fix than small cracks because they pull the surface material away from the subsurface. Using a foam backer rod in these cases is recommended. Alternatively, you can use a special flexible concrete crack filler like Polymer Self-Leveling Sealant.
These products are easy to apply and offer a flexible solution that will accommodate the expansion and contraction of the concrete as it thaws and freezes. Before applying, make sure the crack is clean and dry and that it’s a minimum of 1/2 inch wide. Depending on the size of the crack, you may need to chisel or hammer it open slightly before you can fill it.
If the cracks in your driveway are caused by root penetration from surrounding trees or if they result from improper installation, you’ll need to contact a professional. They will need to core test the depth of the asphalt and, if necessary, replace or overlay the damaged area.
If you have a dirt or gravel driveway, regular sealing will help slow the rate at which it wears down. Ideally, it would be best to do this once a year with an oil-based product or a hot acrylic sealer that can be applied quickly.
Potholes are a common problem for driveways, roads, and just about any pavement that gets used. They can be a pain to drive over, cause damage to vehicles, and make the surface unstable, which could lead to further problems. It’s important to fix potholes promptly before they get bigger.
In asphalt driveways, the most common cause of potholes is water or ice seeping beneath the surface and melting, then sinking back into the cracks. These displaced areas weaken the asphalt; then, it gets further cut when cars drive over it repeatedly. The weight of these heavy vehicles causes the surface to be shifted and cracked, eventually creating a hole in the pavement.
Another common cause of potholes is drainage issues. If the pavement is constantly getting wet, it can start to break down and weaken. This is especially true if the area is located in a flood zone where water tends to pool in these spots.
If you’re noticing water or ice in the middle of your driveway, it’s a good idea to call a professional to check the drainage issues. They can advise you on how to fix any problems and, if needed, make repairs.
For a temporary solution, there are some great DIY pothole repair products on the market. These are made from road-grade asphalt and aggregates like sand, crushed stone, recycled concrete, and geosynthetic aggregates. These are designed to hold up over time and not be as permanent as a professionally done job.
If you’re interested in this option, it’s best to follow the manufacturer’s instructions carefully, as each product has its specific process for the best results. After the mixture is filled in, it’s important to tamp it down to ensure that the material stays in place and isn’t easily displaced by the weight of cars driving over it. A tamper can be rented at many hardware stores, or you can make your own using a nail and a four-foot-long 24. This will help the mixture to stay in place longer, giving it a better chance of lasting a while without the need for further repairs.
Concrete is one of the most durable materials for driveways, but it can still suffer damage over time. While small hairline cracks are normal and usually not a reason for alarm, large cracks and potholes should be repaired immediately to prevent further deterioration and to avoid potential safety hazards for drivers and pedestrians.
Small cracks and divots can be repaired with a concrete driveway patch or filler, available at home improvement stores. These products are easy to use and require only a clean surface and the application of the repair compound. Once the patch is dry, you can smooth it with a putty knife and paint over it if desired. For larger holes, you may need to use a cold patch asphalt product. This is a thicker material that can be added to the surface of your driveway and is injected with a special pump into recessed areas.
Staining and discoloring your driveway is another common sign that it needs repair. Oil spills, water damage, mildew or mold, and other factors can cause these marks. They may not only be unsightly but also indicate a deeper problem, causing the concrete to deteriorate and crack. If the staining is severe, you can use a concrete cleaner, such as ACT Microbial Concrete Cleaner (available on Amazon), to help remove it from your driveway surface.
For older concrete driveways, a resurfacing treatment may be needed to restore the appearance and extend the life of the material. While resurfacing isn’t a DIY project, many homeowners find it can be accomplished with minimal difficulty. A professional contractor can recommend the best materials for your situation and provide detailed instructions for applying them.
Lastly, after you have repaired any damaged surfaces and your concrete driveway is clean, it’s important to protect it with a sealant. This will help to keep moisture from lingering on the surface and prevent the concrete from drying out, which can cause it to crack and crumble. Be sure to choose a sealant appropriate for your climate and follow the instructions carefully.
Concrete is one of the most durable construction materials, and a well-maintained concrete driveway will look great for years. But, like any other material, concrete can be susceptible to damage over time. Cracks, holes, and discoloration are common issues with many types of driveways. It’s important to repair these problems as soon as possible to prevent further damage and keep your driveway looking its best.
The choice of whether to DIY or hire a professional for driveway repairs can make all the difference in both the quality and cost of your final results. If you decide to go the DIY route, there are several different options available for repairing cracks and potholes. Asphalt sealers and patching products can be found at most hardware stores and are relatively affordable for small jobs. If your concrete driveway has a lot of large cracks, consider hiring a professional for the job.
Bigger cracks, holes, and discoloration on concrete surfaces are usually a sign of more extensive damage beneath the surface. A professional can use various methods to save your damaged driveway, including surface and dig-out patching. In a surface patching project, a few inches of the old asphalt is milled off and cleaned, and new asphalt is poured and compacted. For more severe cases, a dig-out patching project involves completely removing the failed area of the driveway and installing an entirely new section from scratch.
For a more comprehensive solution, resurfacing is an excellent option for concrete driveways. A resurfacing contractor can apply a layer of new asphalt or cement to the entire drive, covering imperfections and making it look brand new. This is a much more expensive option than simply sealing or patching your existing surface, but it will ensure that your driveway looks its best for as long as possible.
It’s also important to note that concrete is more resilient than asphalt and will last longer in most climates. That said, however, asphalt will need resealing much more frequently than concrete. While opting to DIY your asphalt driveway repairs can save you some money, you’ll likely have to spend more, in the long run, to take care of bigger repair projects that could have been avoided with a little more professional help.
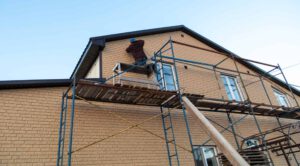
Repairing Your Home’s Exterior
Keeping your home’s exterior looking good doesn’t just increase curb appeal. It also helps protect your house from water damage and other problems that can lead to costly repairs. For more information visit Siding Companies Charleston SC.
Replacing home siding can be a major expense, but it’s usually only necessary when the damage is severe or spreads to the entire house. Smaller issues like dents can be repaired in a much more cost-effective way.
When cracks in your siding occur, you need to address them quickly before the problem worsens. This is because cracked siding can lead to water damage, mold growth, and structural issues. In addition, ignoring these problems can affect the appearance of your home and its value. However, fixing cracks in your siding is a fairly straightforward process that can be accomplished with a few basic tools and supplies. By assessing the damage, gathering necessary materials, and taking proper safety precautions, you can successfully repair your cracked siding.
Before beginning a project to repair cracked siding, choose a day free of bad weather. Getting caught in the rain halfway through a repair project can ruin your work and leave you with an unsightly mess. Also, clean the area around the damaged siding using soap and water before you begin. This will help ensure that your repair materials adhere properly and provide a smooth, clean finish.
Next, locate any trim or molding covering the edges of the affected panel. If there is any, remove it using a pry bar or hammer. Then, find the nails or fasteners securing the panel to the underlying structure and carefully remove them. You may need to use wood shims to prevent further damage to the surrounding siding as you do this.
Once the underlying structure of the affected panel is free, apply adhesive or caulk to the back of a replacement piece and secure it in place. Use a nail gun or hammer to drive in the nails, being careful not to over-tighten them and to allow for natural expansion and contraction. Once the replacement panel is in place, reinstall any trim or molding removed and touch up any paint where needed.
While you are at it, be sure to inspect the rest of your siding for any signs of damage or wear. Note the type of cracking or warping occurring so that you can address the problem in the same manner when you are ready to do more extensive repairs.
Whether your home’s siding is made of brick or aluminum, a hole in the wall can be a real eye-sore. Luckily, both types of siding follow similar installation and repair processes.
If the damage is minor, a little color-matched caulk can help hide it and create a clean, finished appearance. If the hole is large, you may need to replace the damaged section of the siding.
Before beginning any work, you should thoroughly inspect the damage and assess its structural integrity. If the damage is severe and threatens the stability of your house’s exterior, it’s best to contact a professional for assistance.
To repair a hole in aluminum siding, you must find a suitable filler for the gap. Depending on your siding type, you may need a spackling compound, wood filler, or another product. It’s important to choose a filler that is compatible with your siding material and applies easily. For the smoothest finish, you should use a putty knife to spread the filler.
Fixing a hole in brick siding is slightly more complicated but still fairly straightforward. You will need a mortar mix that closely matches your brick’s color, a bucket, and a trowel. You’ll also need a sponge and a brush to help smooth the mortar and add texture. The mortar should dry completely before you can reattach the piece of siding.
If you’re repairing a hole in vinyl siding, you can take a few extra steps to ensure a smooth, seamless look. Start by cleaning the area around the hole with a mild detergent solution and then rinsing it thoroughly to remove any remaining dirt or debris. Once the area is clean and dry, load your caulk gun with an exterior-grade caulk that matches your siding. Apply the caulk to the punctured area, overfilling it slightly. Then, smooth out the caulk with your finger or a putty knife.
For larger holes in vinyl siding, you can use a zip tool to unlock the lower lip of a matching siding piece, then place it on top of the damaged section with construction adhesive. If you can’t find a replacement piece of vinyl, use foil tape to cover the hole and then lap a sheet of new vinyl up to and behind both courses of siding above it.
Mold is a type of living fungus that can grow on the surface of vinyl siding and other materials when the conditions are right. It thrives in dark, warm, humid environments and can damage or discolor surfaces. Mold can also cause health problems for those living in the home.
If your home has mold growth, it’s important to act quickly to remove it. Otherwise, the spores can spread to other home parts and wreak havoc. Mold is typically black in appearance, though it can also be green or gray. It can also look like streaks or dots.
To prevent mold from growing on your vinyl siding, keep it clear of debris and plant growth. Trim any trees or bushes too close to your house, which can block sunlight and prevent air from circulating properly around the siding. It’s also a good idea to clean your gutters regularly, as clogged gutters can lead to water damage that can encourage mold growth.
If you spot any signs of mold or mildew on your siding, you can easily remove it yourself. Start by cleaning the area with a hose or pressure washer. Light accumulations usually come off with just a little bit of spray, while more serious spots may require the use of an appropriate cleaning solution. If using a cleaning solution, wear the proper safety gear. This should include disposable gloves, goggles, and a mask to protect yourself from direct contact with and inhalation of mold spores.
Once the area is free of dirt and mildew, use a brush or sponge soaked in your chosen cleaner to scrub the moldy areas. Be sure to use firm but controlled pressure, and pay special attention to deep-seated or stubborn stains. Once the moldy areas are cleared, use a hose or pressure washer to rinse off the siding.
Once the area is cleaned, you can patch any holes with a plywood patch. Cut a piece of plywood to a size that is slightly larger than the hole in your siding. Apply a bead of adhesive caulk around the edges to help hold the patch in place.
Loose siding can be a major issue for your home. It can lead to water infiltration, rot, and pest infestation. Loose siding can also impact the look and value of your home. However, loose siding can be repaired easily and quickly.
Typically, the cause of loose siding is age and wear. This can make the material brittle and cause it to loosen. Severe weather conditions, such as hail and wind, can also reduce and rip away sections of siding. This can be especially true for vinyl siding, which is prone to damage from wind and hail.
One way to fix loose siding is to tighten the fasteners that hold it to the wall. This can be done by using a tool called a siding unlock tool, which is available at most hardware and home improvement stores. This tool is designed to help you easily remove a loose panel of siding from your wall without damaging it or the surrounding panels.
If tightening the fasteners does not fix your loose siding, you may need to reattach the damaged panel. This can be a time-consuming process, but it is necessary to ensure your siding is secure and safe for use. To do this, you must position yourself on a ladder near the area of the damaged siding and prepare your tools. Before attempting this, it is recommended that you check for other signs of damage, such as rotting or mold, which may indicate the need to replace your siding.
Once you have positioned yourself on a ladder, carefully examine the area of the damaged siding to determine what needs to be repaired. If you are still looking for what is wrong with the siding, it is a good idea to have a professional inspect your property.
If you decide to repair the damaged section of the siding, start by removing the old panel. Once the panel has been removed, measure the space to make sure that you have a replacement patch that is the same size as the removed piece. Then, cut a new vinyl siding two inches wider on each side than the damaged panel. This will give you room to work and ensure the patch fits well. Once the vinyl patch has been cut, apply a bead of caulk to the back of the panel and the area surrounding the hole or crack. This will help to prevent the patch from coming loose again in the future.