Home » Construction Services
Category Archives: Construction Services
Safety Precautions for Boat Lift Installation
There are a variety of boat lift styles to choose from. It is essential to choose the right one based on the water depth and other environmental conditions in your area.
For example, if your location experiences rough water or storm tides you should consider a heavier-duty lift. Maintenance is also an essential factor. Keep reading the article below to learn more about Boat Lift Installation.
Whether you’re hiring professionals or using your own skills to install a boat lift, safety should always be your first priority. It’s easy to overlook important safety precautions, which can put you and others at risk. This can include everything from properly balancing the lift to using the correct tools. It’s also important to understand how the lift works and not skip any steps.
It’s also important to know how much your lift can hold. Every lift has a rated weight capacity, and exceeding this limit can cause damage. This may result in the cables breaking or the lift becoming unbalanced. It’s important to take into account the weight of the boat, the boat’s accessories, and any fuel you will be bringing to the water.
Another crucial aspect of safety is to always be aware of where your boat is when lifting it in and out of the water. This will ensure that you’re not raising or lowering your boat too high, which could damage the lift system or the hull of your boat. Additionally, it’s a good idea to always listen to the lift as it operates to make sure there are no signs of resistance or strain.
In terms of preparing the lift for the season, it’s important to inspect the entire lift for any cracks or broken welds that need to be fixed. You should also check for excessive rust, which can cause corrosion that will lead to the lift failing over time. Additionally, you should inspect the legs of the lift to make sure they’re level and balanced.
When it comes to the actual installation, you’ll want to follow all of the manufacturer’s instructions carefully. Be sure to use the proper tools and don’t skip any steps, even if they seem simple or obvious. It’s worth the extra effort to do things correctly so that your lift will last for years to come. By following these tips, you’ll be well on your way to enjoying a safe summer on the water. Good luck!
Preparation is Key
The best way to minimize the risk of a boat lift failure during rough weather is to prepare adequately before the storm hits. That includes everything from examining the cable and scheduling professional safety inspections to taking proper care of your bilge pump, battery, and other vital components of your boat’s electrical system.
The specific steps you take will vary depending on the type of boat lift you have installed, but most installs require similar preparations to ensure that you’re ready for any rough conditions that might arise. For instance, if you have a pile-mounted lift, you’ll need to ensure that the pilings are driven correctly and are at the correct height before proceeding with the rest of the installation. An incorrectly-driven piling may shift, sink or otherwise fail during a severe storm surge and can cause all sorts of problems for the lift that is sitting on top.
It’s also a good idea to prepare your vessel by tying mooring lines to a solid structure on the boat and a chosen anchor point on land. This will not only help reduce the stress on bilge pumps and batteries, but it can also make it more difficult for the winds to blow the line free or cause other types of damage.
Additionally, you should remove any unnecessary gear from your vessel that could add extra weight, as well as tie the vessel up at its maximum storage height to create additional tension in the mooring lines. This will also make it easier to lower your boat during a storm.
In addition, you should always turn off the power to your boat lift before a storm and disconnect any electrical connections or remote control systems to prevent electrical damage or hazards. In the event of an emergency, this preparation will make it much easier to get your boat back in the water and prevent injuries for anyone on board.
Communication Is Key
A boat lift can save you time and money by eliminating the need to transport your water vessel. It can also prevent wet storage, which can cause damage to your boat’s hull and propellers. However, the installation process is complex and must be done by a licensed professional to avoid the risk of electrocution or injury.
A professional can help you understand the exact requirements for a safe installation, as well as provide tips and tricks for using your lift. For example, it’s important to understand how to properly position your boat in the lift to avoid damage or overwork your cables and motors. It is also crucial to make sure that your vessel is evenly distributed across the cradle. Excess weight in the front or back can cause the cables to become damaged, while a boat that is not adequately supported can damage the bunk boards and guide posts.
If you are assembling your lift yourself, make sure that you are following all the instructions carefully. It is also important to wear protective equipment, such as gloves and safety glasses, while working on the installation. This will reduce the risk of injury and ensure that you can complete the task without delay. Lastly, it is important to have access to a flat work area and a variety of tools.
Once you have assembled the lift, it’s time to test it out. It is a good idea to have a friend or family member join you to help you operate it. This can be especially helpful if you’re not familiar with the operation of a lift. It’s also a good idea to rinse the lift cables regularly with fresh water to avoid abrasion and damage.
You’ll also want to think about how often you’ll be launching and retrieving your boat from the lift. If you plan on taking your boat out frequently, it may be worth investing in a lift with a higher capacity to accommodate future upgrades in your vessel. If you live in a rough water location, you’ll also need to consider the durability of your lift, as it may experience more wear and tear than one in a calmer environment.
Follow the Manufacturer’s Instructions
It is important to follow the manufacturer’s instructions when it comes to boat lift installation. Not only is this to avoid potential safety issues, but it’s also to ensure the lift is able to perform as expected. Any modifications or deviations can compromise the integrity of the lift and pose a safety risk for anyone using it. If you aren’t sure of the proper steps to take, it is best to leave the installation to a professional who can handle everything safely and correctly.
Having the right size lift for your boat is another critical factor to consider before investing in one. Factors such as the size of your boat, fuel weight, additional equipment, and batteries all play into determining what kind and how much capacity you need. Make sure your lift can support any future upgrades you may want to do as well.
Proper spacing between slings or cradle beams is also crucial for proper lifting and storage of your boat. Be sure to find the center of gravity for your boat and use this information to determine where the slings or cradle should be placed on the lift. This will help to ensure your boat is supported evenly and won’t cause damage as it is moved in and out of the water.
Finally, make sure your lift is the correct width for your existing slip, if applicable. This will save a lot of time and hard work, as well as prevent any unnecessary rework down the road.
Be sure to keep a close eye on your cables for signs of wear or damage, as this could pose a serious safety risk. If you notice any issues, be sure to contact your dealer immediately.
Boat lifts are a great way to protect your boat and extend its life. They can also help to reduce maintenance costs and increase the value of your waterfront property.
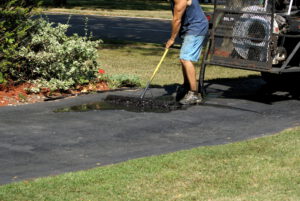
How Driveway Repair Can Help Extend the Lifespan of Your Driveway
Your driveway is a major investment. Regular maintenance and repairs can extend its lifespan, delaying the need to replace it.
Professional contractors like Paving Companies Charleston SC have the tools and equipment to perform the most effective repairs. They can also provide expert advice. Ask about the materials and techniques they plan to use for long-lasting results.
It is normal for concrete and asphalt driveways to develop cracks over time. But it’s important to address them as soon as you can before they get worse. Often, cracks indicate underlying issues, such as poor drainage, soil settlement, or inadequate pavement thickness. Wide cracks can also lead to water or ice seepage, further damaging the surface.
Hairline cracks are usually not a big deal, but they should be repaired soon because they can grow wider over time. It’s also a good idea to repair any cracks that are wider than the width of your credit card because they can be a tripping hazard and allow debris and dirt to enter the surface.
Wide cracks are caused by pressure and expansion from heavy vehicles driving over the surface or by ground movement. They can be more difficult to fix than small cracks because they pull the surface material away from the subsurface. Using a foam backer rod in these cases is recommended. Alternatively, you can use a special flexible concrete crack filler like Polymer Self-Leveling Sealant.
These products are easy to apply and offer a flexible solution that will accommodate the expansion and contraction of the concrete as it thaws and freezes. Before applying, make sure the crack is clean and dry and that it’s a minimum of 1/2 inch wide. Depending on the size of the crack, you may need to chisel or hammer it open slightly before you can fill it.
If the cracks in your driveway are caused by root penetration from surrounding trees or if they result from improper installation, you’ll need to contact a professional. They will need to core test the depth of the asphalt and, if necessary, replace or overlay the damaged area.
If you have a dirt or gravel driveway, regular sealing will help slow the rate at which it wears down. Ideally, it would be best to do this once a year with an oil-based product or a hot acrylic sealer that can be applied quickly.
Potholes are a common problem for driveways, roads, and just about any pavement that gets used. They can be a pain to drive over, cause damage to vehicles, and make the surface unstable, which could lead to further problems. It’s important to fix potholes promptly before they get bigger.
In asphalt driveways, the most common cause of potholes is water or ice seeping beneath the surface and melting, then sinking back into the cracks. These displaced areas weaken the asphalt; then, it gets further cut when cars drive over it repeatedly. The weight of these heavy vehicles causes the surface to be shifted and cracked, eventually creating a hole in the pavement.
Another common cause of potholes is drainage issues. If the pavement is constantly getting wet, it can start to break down and weaken. This is especially true if the area is located in a flood zone where water tends to pool in these spots.
If you’re noticing water or ice in the middle of your driveway, it’s a good idea to call a professional to check the drainage issues. They can advise you on how to fix any problems and, if needed, make repairs.
For a temporary solution, there are some great DIY pothole repair products on the market. These are made from road-grade asphalt and aggregates like sand, crushed stone, recycled concrete, and geosynthetic aggregates. These are designed to hold up over time and not be as permanent as a professionally done job.
If you’re interested in this option, it’s best to follow the manufacturer’s instructions carefully, as each product has its specific process for the best results. After the mixture is filled in, it’s important to tamp it down to ensure that the material stays in place and isn’t easily displaced by the weight of cars driving over it. A tamper can be rented at many hardware stores, or you can make your own using a nail and a four-foot-long 24. This will help the mixture to stay in place longer, giving it a better chance of lasting a while without the need for further repairs.
Concrete is one of the most durable materials for driveways, but it can still suffer damage over time. While small hairline cracks are normal and usually not a reason for alarm, large cracks and potholes should be repaired immediately to prevent further deterioration and to avoid potential safety hazards for drivers and pedestrians.
Small cracks and divots can be repaired with a concrete driveway patch or filler, available at home improvement stores. These products are easy to use and require only a clean surface and the application of the repair compound. Once the patch is dry, you can smooth it with a putty knife and paint over it if desired. For larger holes, you may need to use a cold patch asphalt product. This is a thicker material that can be added to the surface of your driveway and is injected with a special pump into recessed areas.
Staining and discoloring your driveway is another common sign that it needs repair. Oil spills, water damage, mildew or mold, and other factors can cause these marks. They may not only be unsightly but also indicate a deeper problem, causing the concrete to deteriorate and crack. If the staining is severe, you can use a concrete cleaner, such as ACT Microbial Concrete Cleaner (available on Amazon), to help remove it from your driveway surface.
For older concrete driveways, a resurfacing treatment may be needed to restore the appearance and extend the life of the material. While resurfacing isn’t a DIY project, many homeowners find it can be accomplished with minimal difficulty. A professional contractor can recommend the best materials for your situation and provide detailed instructions for applying them.
Lastly, after you have repaired any damaged surfaces and your concrete driveway is clean, it’s important to protect it with a sealant. This will help to keep moisture from lingering on the surface and prevent the concrete from drying out, which can cause it to crack and crumble. Be sure to choose a sealant appropriate for your climate and follow the instructions carefully.
Concrete is one of the most durable construction materials, and a well-maintained concrete driveway will look great for years. But, like any other material, concrete can be susceptible to damage over time. Cracks, holes, and discoloration are common issues with many types of driveways. It’s important to repair these problems as soon as possible to prevent further damage and keep your driveway looking its best.
The choice of whether to DIY or hire a professional for driveway repairs can make all the difference in both the quality and cost of your final results. If you decide to go the DIY route, there are several different options available for repairing cracks and potholes. Asphalt sealers and patching products can be found at most hardware stores and are relatively affordable for small jobs. If your concrete driveway has a lot of large cracks, consider hiring a professional for the job.
Bigger cracks, holes, and discoloration on concrete surfaces are usually a sign of more extensive damage beneath the surface. A professional can use various methods to save your damaged driveway, including surface and dig-out patching. In a surface patching project, a few inches of the old asphalt is milled off and cleaned, and new asphalt is poured and compacted. For more severe cases, a dig-out patching project involves completely removing the failed area of the driveway and installing an entirely new section from scratch.
For a more comprehensive solution, resurfacing is an excellent option for concrete driveways. A resurfacing contractor can apply a layer of new asphalt or cement to the entire drive, covering imperfections and making it look brand new. This is a much more expensive option than simply sealing or patching your existing surface, but it will ensure that your driveway looks its best for as long as possible.
It’s also important to note that concrete is more resilient than asphalt and will last longer in most climates. That said, however, asphalt will need resealing much more frequently than concrete. While opting to DIY your asphalt driveway repairs can save you some money, you’ll likely have to spend more, in the long run, to take care of bigger repair projects that could have been avoided with a little more professional help.
Repairing Your Home’s Exterior
Keeping your home’s exterior looking good doesn’t just increase curb appeal. It also helps protect your house from water damage and other problems that can lead to costly repairs. For more information visit Siding Companies Charleston SC.
Replacing home siding can be a major expense, but it’s usually only necessary when the damage is severe or spreads to the entire house. Smaller issues like dents can be repaired in a much more cost-effective way.
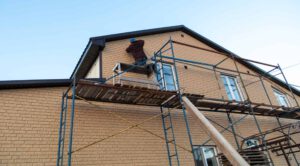
When cracks in your siding occur, you need to address them quickly before the problem worsens. This is because cracked siding can lead to water damage, mold growth, and structural issues. In addition, ignoring these problems can affect the appearance of your home and its value. However, fixing cracks in your siding is a fairly straightforward process that can be accomplished with a few basic tools and supplies. By assessing the damage, gathering necessary materials, and taking proper safety precautions, you can successfully repair your cracked siding.
Before beginning a project to repair cracked siding, choose a day free of bad weather. Getting caught in the rain halfway through a repair project can ruin your work and leave you with an unsightly mess. Also, clean the area around the damaged siding using soap and water before you begin. This will help ensure that your repair materials adhere properly and provide a smooth, clean finish.
Next, locate any trim or molding covering the edges of the affected panel. If there is any, remove it using a pry bar or hammer. Then, find the nails or fasteners securing the panel to the underlying structure and carefully remove them. You may need to use wood shims to prevent further damage to the surrounding siding as you do this.
Once the underlying structure of the affected panel is free, apply adhesive or caulk to the back of a replacement piece and secure it in place. Use a nail gun or hammer to drive in the nails, being careful not to over-tighten them and to allow for natural expansion and contraction. Once the replacement panel is in place, reinstall any trim or molding removed and touch up any paint where needed.
While you are at it, be sure to inspect the rest of your siding for any signs of damage or wear. Note the type of cracking or warping occurring so that you can address the problem in the same manner when you are ready to do more extensive repairs.
Whether your home’s siding is made of brick or aluminum, a hole in the wall can be a real eye-sore. Luckily, both types of siding follow similar installation and repair processes.
If the damage is minor, a little color-matched caulk can help hide it and create a clean, finished appearance. If the hole is large, you may need to replace the damaged section of the siding.
Before beginning any work, you should thoroughly inspect the damage and assess its structural integrity. If the damage is severe and threatens the stability of your house’s exterior, it’s best to contact a professional for assistance.
To repair a hole in aluminum siding, you must find a suitable filler for the gap. Depending on your siding type, you may need a spackling compound, wood filler, or another product. It’s important to choose a filler that is compatible with your siding material and applies easily. For the smoothest finish, you should use a putty knife to spread the filler.
Fixing a hole in brick siding is slightly more complicated but still fairly straightforward. You will need a mortar mix that closely matches your brick’s color, a bucket, and a trowel. You’ll also need a sponge and a brush to help smooth the mortar and add texture. The mortar should dry completely before you can reattach the piece of siding.
If you’re repairing a hole in vinyl siding, you can take a few extra steps to ensure a smooth, seamless look. Start by cleaning the area around the hole with a mild detergent solution and then rinsing it thoroughly to remove any remaining dirt or debris. Once the area is clean and dry, load your caulk gun with an exterior-grade caulk that matches your siding. Apply the caulk to the punctured area, overfilling it slightly. Then, smooth out the caulk with your finger or a putty knife.
For larger holes in vinyl siding, you can use a zip tool to unlock the lower lip of a matching siding piece, then place it on top of the damaged section with construction adhesive. If you can’t find a replacement piece of vinyl, use foil tape to cover the hole and then lap a sheet of new vinyl up to and behind both courses of siding above it.
Mold is a type of living fungus that can grow on the surface of vinyl siding and other materials when the conditions are right. It thrives in dark, warm, humid environments and can damage or discolor surfaces. Mold can also cause health problems for those living in the home.
If your home has mold growth, it’s important to act quickly to remove it. Otherwise, the spores can spread to other home parts and wreak havoc. Mold is typically black in appearance, though it can also be green or gray. It can also look like streaks or dots.
To prevent mold from growing on your vinyl siding, keep it clear of debris and plant growth. Trim any trees or bushes too close to your house, which can block sunlight and prevent air from circulating properly around the siding. It’s also a good idea to clean your gutters regularly, as clogged gutters can lead to water damage that can encourage mold growth.
If you spot any signs of mold or mildew on your siding, you can easily remove it yourself. Start by cleaning the area with a hose or pressure washer. Light accumulations usually come off with just a little bit of spray, while more serious spots may require the use of an appropriate cleaning solution. If using a cleaning solution, wear the proper safety gear. This should include disposable gloves, goggles, and a mask to protect yourself from direct contact with and inhalation of mold spores.
Once the area is free of dirt and mildew, use a brush or sponge soaked in your chosen cleaner to scrub the moldy areas. Be sure to use firm but controlled pressure, and pay special attention to deep-seated or stubborn stains. Once the moldy areas are cleared, use a hose or pressure washer to rinse off the siding.
Once the area is cleaned, you can patch any holes with a plywood patch. Cut a piece of plywood to a size that is slightly larger than the hole in your siding. Apply a bead of adhesive caulk around the edges to help hold the patch in place.
Loose siding can be a major issue for your home. It can lead to water infiltration, rot, and pest infestation. Loose siding can also impact the look and value of your home. However, loose siding can be repaired easily and quickly.
Typically, the cause of loose siding is age and wear. This can make the material brittle and cause it to loosen. Severe weather conditions, such as hail and wind, can also reduce and rip away sections of siding. This can be especially true for vinyl siding, which is prone to damage from wind and hail.
One way to fix loose siding is to tighten the fasteners that hold it to the wall. This can be done by using a tool called a siding unlock tool, which is available at most hardware and home improvement stores. This tool is designed to help you easily remove a loose panel of siding from your wall without damaging it or the surrounding panels.
If tightening the fasteners does not fix your loose siding, you may need to reattach the damaged panel. This can be a time-consuming process, but it is necessary to ensure your siding is secure and safe for use. To do this, you must position yourself on a ladder near the area of the damaged siding and prepare your tools. Before attempting this, it is recommended that you check for other signs of damage, such as rotting or mold, which may indicate the need to replace your siding.
Once you have positioned yourself on a ladder, carefully examine the area of the damaged siding to determine what needs to be repaired. If you are still looking for what is wrong with the siding, it is a good idea to have a professional inspect your property.
If you decide to repair the damaged section of the siding, start by removing the old panel. Once the panel has been removed, measure the space to make sure that you have a replacement patch that is the same size as the removed piece. Then, cut a new vinyl siding two inches wider on each side than the damaged panel. This will give you room to work and ensure the patch fits well. Once the vinyl patch has been cut, apply a bead of caulk to the back of the panel and the area surrounding the hole or crack. This will help to prevent the patch from coming loose again in the future.
Make The Internet Work For You! Internet Marketing Tips Any Business Can Use
These days, so much business takes place on the Internet that everyone should know how vital an effective Internet marketing campaign is to business success. If you are looking for some advice for getting the most from your online marketing efforts, this article will give you some advice that can help.
Observe your competitors. You could learn from their successes and mistakes. If you could see yourself purchasing something from them, then you can guarantee that they are doing the right thing. Look for ways that you can use their ideas into your own unique strategy.
Do not let a “404” hit your network. There is nothing more frustrating than to click a link, only to have it tell you the page has moved. When you move or change a page, provide a redirect allowing the search engine to navigate your consumer to the correct page, even if the link they have on record is invalid.
Make it easy to buy from your website. Mark all prices clearly, and specify shipping options and charges up front so the customer does not have to wonder. Show all items and charges on the final page before the customer clicks to confirm. And after the order is accepted, give a confirmation number and an estimated date for them to receive their merchandise.
Tweaking the appearance of your internet marketing website can result in an increase in sales for your business. Try moving your “Buy Now” button to a different location to see if it gets more use. Find out if a different color scheme induces your customers to linger a bit longer on your website.
Getting great results from your Internet marketing efforts is crucial to your business success, so be sure you maximize your marketing presence. By making use of the techniques and ideas in this article, you will be able to run a highly effective Internet marketing campaign that will have a significant impact on your bottom line.
Brenner Dental NY, PP Paintings, Rachana Overseas Inc, Napdwa, JD Advanced Remodeling, Fenix Safety Solutions, Thomas Rayfiel, Brush N Scrub, Andaman Electrical Marine, Elite Cooling, Whimsy Wanders, Constructive CRC, Jude And Jay, Pop Running World Zone, Camera Manual Store, 135 Belvedere Avenue, Climb East Bay, Snoco Blueprint, Counter To Curb, Narrow Bay Historical, Arvin Construction Services, D Hawal SEO, FFX Tree Stewards, Principle Of Marketing, Uniquely Yours MO, Anchored Voices, Sway Aqua Culture, Cornwall Bio Park, Be The Change Active, Bella Proven, KGB-Workshop, Mobile Home Salesman, WSB Summit, Fireball Australia, The Fiber Maven, Creatif Spaces, Shutter Up, Personalised Beauty Global, Metro Bakers Field, Connections NJ.
Factors To Consider While Choosing A Concrete Contractor
Concrete contractors possess a variety of specialized skills that allow them to perform a wide range of concrete services related to various construction projects. They have the necessary skills, tools, and equipment required to perform concrete services and thus are very important for any type of building construction. It is therefore essential for you to find a concrete contractor who possesses the skills and equipment that suit your needs. Here are some of the most important things that you must consider when looking for a concrete contractor:
Experienced Concrete Contractors: Their expertise comes from years of experience and they know all the tricks of the trade. Hence, be careful while choosing a concrete contractor as they may lack the necessary experience or may be inexperienced. An experienced concrete contractor would have gained significant experience over time and would be able to handle almost any concrete construction. Moreover, experienced concrete contractors possess knowledge about various products and methods that would help them to complete concrete works faster and at a lower cost. Therefore, be careful while choosing a contractor who has obtained significant experience in this specialized field.

Creativity: The concrete contractors should have a broad knowledge of decorative concrete techniques to add beauty to your home. They should be well aware of the various ways in which concrete can be incorporated into various architectural designs. Thus, they should be capable of designing and implementing a wide variety of concrete products that can add charm and flair to your home. They should be aware of the concrete coloring that can be applied to concrete slabs and pavers. They should be able to implement colored concrete that can enhance the aesthetic appeal of your home.
Proficient finishing skills: You need to hire concrete contractors who can finish concrete on time and within the set deadline. A skilled and experienced finishing contractor should be capable of completing concrete work within the stipulated time. They should also be capable of providing you with effective finishing details that can enhance the overall beauty of the home. Therefore, hire the best concrete contractors for seamless and trouble-free finishing of your projects.
Site preparation: Before hiring concrete contractors you must ensure that they have the expertise and experience in site preparation. Site preparation is an important aspect of any construction work. It is the foundation upon which any building is constructed. Therefore, you must look for those concrete contractors who have expertise in site preparation and understand the necessity of site preparation and its impact on your construction project.
Good foundation: Good foundations make for good constructions. Hence, you need to choose concrete contractors who are skilled and experienced in designing and planning good foundations. Concrete foundations include slab foundations, poured foundations, precast foundations and slab basement foundations. All these types of foundations require a structured approach for their design and implementation. A skilled concrete contractor should have the required skill and expertise to design and implement sound foundations. They should also be adept at estimating the costs related to such structures.
Pre-cast concrete construction: The pre-cast concrete system is one of the most innovative ways to construct houses and other buildings. The process involves laying down the concrete before pouring it into the mold. The concrete contractors should be well aware of the techniques involved in pre-cast concrete construction. This system requires the concrete to be placed in molds while it is being formed and cooled in a kiln.
Concrete finishing techniques: Another important aspect of concrete construction is the concrete finishing techniques used. A skilled concrete contractor should be able to employ quality techniques to enhance the beauty of the concrete and make them more durable and resistant to adverse weather conditions. These techniques involve sanding, cleaning, painting, coating and sealing. Therefore, you should check for concrete contractors who have the required expertise in these techniques. You can also make use of the internet to find concrete contractors.