Carved Concrete Contractors
Starting a concrete business requires a thorough market analysis, the right tools and training, and obtaining all necessary legal licenses and permits. Those requirements vary by state.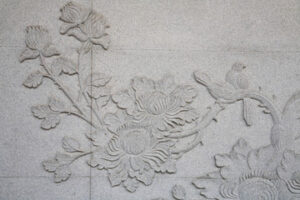
Carving into a fresh concrete mix can give homeowners and businesses a one-of-a-kind decorative accent that can look like stones, rocks, or chiseled wood. It also brings life to plain walls. Contact Carved Concrete Contractor for professional help.
Carving concrete in relief is a way to add a unique and distinctive decorative element to walls, patios and other surfaces. Concrete contractors who have the proper tools and training can create stunning one-of-a-kind pieces that can truly set a home or business apart from all the rest. This sculptural technique uses a specialized concrete mix that contains finer grades of sand and polymers than standard concrete. This makes it easier to shape, stamp, color and carve into. It also holds its shape and texture longer, making it a great choice for outdoor projects.
For those who are interested in learning this art form, it’s recommended that they begin by creating a simple project such as a steppingstone or bird bath. This will allow the new carver to gain confidence and experience before attempting larger projects, such as vertical concrete carving. It’s also important to wear a dust mask and gloves while working with concrete, as it contains silica, which can irritate the skin and lung tissues when inhaled over an extended period of time.
Relief sculpture is an ancient art form that involves chiseling away the background to make sculpted objects seem as though they are elevated above a solid surface. It’s an art form that never fell out of favor, and even today, it’s still a popular option for many artists. It’s seen in works like the Nimrud ivories, Late Antique Consular diptychs and the Berthouville Casket. It’s also used by contemporary artists to play with scale and form.
Stamped Concrete
Stamped concrete is a popular way to add the look of stone, brick or wood to patios, walkways and driveways. Installation professionals level and pour a new slab of concrete, then use rubber stamps or skins to texture the wet cement so it takes the shape of the material it’s supposed to mimic. The concrete dries, and contractors apply concrete stains to color the stamped concrete. The finished product can resemble pavers, bricks, slate, natural rock or even wood planks.
If the concrete is poured and textured right, it should have a smooth surface without any holes or cracks. The contractor will then spray a membrane-forming curing compound over the entire surface, and he or she may also add an additive to improve the strength of the concrete.
The next step is to apply a concrete coloring mix that matches the shade of the bricks, pavers or stone that the concrete is supposed to imitate. The contractor will also use an accent color to give the concrete dimension. The accent color is often mixed with a concrete release agent, which has a nonstick effect that helps concrete stamps come off cleanly once the concrete has dried.
Once the concrete is stained and cured, the contractor will apply a sealer to protect it from dirt, rain and sun damage. A reseal every two to three years should keep the concrete looking fresh. If the concrete is exposed to a lot of traffic or wear, it may need an additional coat of sealer, which can add about $1 per square foot to the cost of the project.
A carved concrete patio, walkway or driveway can enhance your property’s curb appeal and increase its value. However, this type of project is challenging and time consuming, so it’s best left to professional contractors who have experience working with concrete.
When hiring a carved concrete contractor, make sure they’re licensed and insured. They should have photos of previous work, as well as references from satisfied clients. They should also be able to provide you with an estimate for the job before starting any work.
Vertical Concrete Carving
Concrete sculptors can take decorative concrete beyond stamped patios and sidewalks to add unique architectural elements to walls, water features and other vertical surfaces. For example, a contractor can carve concrete to look like stones, rocks or chiseled wood and then stain or color the material. This can make a wall or other surface stand out or create an interesting focal point in a room.
Although concrete carving has been around for decades, it’s becoming more popular in residential applications such as fire pits and seat walls that mimic rock, says Emil Gera of Gera Concrete in Weatherly, Pennsylvania. He has found that homeowners are seeking unique designs for their backyards, but some are also looking for design elements to transform living rooms or other interior spaces.
Gera recommends using a concrete mix designed specifically for vertical stamping and carving, such as Kingdom Products Imperial Vertical Carving Mix. The product is lightweight and exceptionally strong and can be carved, textured and stamped to produce stone, brick or block designs. It is easy to work with and can be applied up to 5 inches thick on a properly prepared surface.
Another option for a versatile vertical concrete mix is Tru Pac X, which is an additive that’s mixed with 80-lb bags of standard Type S mortar to produce a high-performance, reusable stampable/carving and vertical mixing mix. It can be used on both a cement or EPS foam substrate.
Regardless of the material or technique, it’s important to prepare the surface for vertical concrete carving properly. This includes ensuring proper formwork and reinforcement, as well as cleaning the shotcrete before applying the base coat or carving mix. It’s also a good idea to mist the surface of the base or sculpting mix regularly to help control moisture loss.
Finally, it’s important to use the right tools for each phase of the job. A hand carving tool is useful for sculpting into the wet concrete and a power tool can be helpful when carving detailed shapes and joints. It’s also a good idea for contractors to wear gloves and a dust mask when working with concrete, as it contains silica that can irritate the skin and lungs over a long period of time.
Etching or Engraving
There are a number of decorative treatments available for freshly placed concrete, including pattern stamping, exposed aggregate and textured overlays. However, if you have existing plain gray concrete that needs a little more decorative flair, engraving or etching is the way to go. These processes use special tools to cut patterns and designs into cured concrete, leaving one-of-a-kind markings or designs that can be further enhanced with staining. Unlike overlays, which are added as a polymer layer on top of the concrete and must be sealed, etched or engraved concrete is carved directly into the surface and is a permanent treatment.
While many people are familiar with the decorative potential of concrete for floors, sidewalks and driveways, fewer are aware that this durable material can also be used to sculpt and shape unique rock and wood-like accents on walls and other vertical surfaces. This unique technique allows contractors to carve concrete into surfaces that resemble stones, rocks and even chiseled wood, and can transform dull basement bars and unsightly foundations into distinctive living spaces and home amenities.
To create the illusion of a carved surface, contractors level and pour a new slab, then use rubber stamps to press and tamp it so it takes on the shape of bricks, stones or wood planks. When the concrete dries, contractors apply concrete stains to color the new surface and match it to the stone or wood they’re mimicking. The resulting finish looks like natural stone, pavers or wood and is long-lasting, low maintenance and slip-resistant.
When it comes to creating the etched or carved appearance, the main difference is that engravings are drawn with sharp, pointed tools while etching is done with acid. When the acid interacts with the metal it etches the soft surface beneath, leaving behind the engraved or carved line. While etching is commonly used on metal plates for printing, it’s also a popular art form and a great option for homeowners who want to add an artistic touch to their concrete.
Fortunately for experienced decorative contractors, there are now a few specialized machines designed to help them master the art of carving concrete. Two patented systems, Engrave-A-Crete and KaleidoCrete, arm them with all the tools they need to cut an endless array of patterns into concrete and achieve professional results. Darrel Adamson, whose background includes remodeling contractor work and a stint as a decorative concrete contractor, developed both of these innovative tools and now trains contractors worldwide through his company, Engrave-A-Crete.
Safety Precautions for Boat Lift Installation
There are a variety of boat lift styles to choose from. It is essential to choose the right one based on the water depth and other environmental conditions in your area.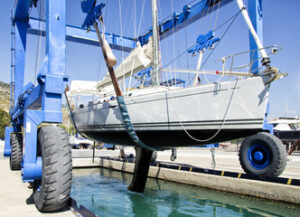
For example, if your location experiences rough water or storm tides you should consider a heavier-duty lift. Maintenance is also an essential factor. Keep reading the article below to learn more about Boat Lift Installation.
Whether you’re hiring professionals or using your own skills to install a boat lift, safety should always be your first priority. It’s easy to overlook important safety precautions, which can put you and others at risk. This can include everything from properly balancing the lift to using the correct tools. It’s also important to understand how the lift works and not skip any steps.
It’s also important to know how much your lift can hold. Every lift has a rated weight capacity, and exceeding this limit can cause damage. This may result in the cables breaking or the lift becoming unbalanced. It’s important to take into account the weight of the boat, the boat’s accessories, and any fuel you will be bringing to the water.
Another crucial aspect of safety is to always be aware of where your boat is when lifting it in and out of the water. This will ensure that you’re not raising or lowering your boat too high, which could damage the lift system or the hull of your boat. Additionally, it’s a good idea to always listen to the lift as it operates to make sure there are no signs of resistance or strain.
In terms of preparing the lift for the season, it’s important to inspect the entire lift for any cracks or broken welds that need to be fixed. You should also check for excessive rust, which can cause corrosion that will lead to the lift failing over time. Additionally, you should inspect the legs of the lift to make sure they’re level and balanced.
When it comes to the actual installation, you’ll want to follow all of the manufacturer’s instructions carefully. Be sure to use the proper tools and don’t skip any steps, even if they seem simple or obvious. It’s worth the extra effort to do things correctly so that your lift will last for years to come. By following these tips, you’ll be well on your way to enjoying a safe summer on the water. Good luck!
Preparation is Key
The best way to minimize the risk of a boat lift failure during rough weather is to prepare adequately before the storm hits. That includes everything from examining the cable and scheduling professional safety inspections to taking proper care of your bilge pump, battery, and other vital components of your boat’s electrical system.
The specific steps you take will vary depending on the type of boat lift you have installed, but most installs require similar preparations to ensure that you’re ready for any rough conditions that might arise. For instance, if you have a pile-mounted lift, you’ll need to ensure that the pilings are driven correctly and are at the correct height before proceeding with the rest of the installation. An incorrectly-driven piling may shift, sink or otherwise fail during a severe storm surge and can cause all sorts of problems for the lift that is sitting on top.
It’s also a good idea to prepare your vessel by tying mooring lines to a solid structure on the boat and a chosen anchor point on land. This will not only help reduce the stress on bilge pumps and batteries, but it can also make it more difficult for the winds to blow the line free or cause other types of damage.
Additionally, you should remove any unnecessary gear from your vessel that could add extra weight, as well as tie the vessel up at its maximum storage height to create additional tension in the mooring lines. This will also make it easier to lower your boat during a storm.
In addition, you should always turn off the power to your boat lift before a storm and disconnect any electrical connections or remote control systems to prevent electrical damage or hazards. In the event of an emergency, this preparation will make it much easier to get your boat back in the water and prevent injuries for anyone on board.
Communication Is Key
A boat lift can save you time and money by eliminating the need to transport your water vessel. It can also prevent wet storage, which can cause damage to your boat’s hull and propellers. However, the installation process is complex and must be done by a licensed professional to avoid the risk of electrocution or injury.
A professional can help you understand the exact requirements for a safe installation, as well as provide tips and tricks for using your lift. For example, it’s important to understand how to properly position your boat in the lift to avoid damage or overwork your cables and motors. It is also crucial to make sure that your vessel is evenly distributed across the cradle. Excess weight in the front or back can cause the cables to become damaged, while a boat that is not adequately supported can damage the bunk boards and guide posts.
If you are assembling your lift yourself, make sure that you are following all the instructions carefully. It is also important to wear protective equipment, such as gloves and safety glasses, while working on the installation. This will reduce the risk of injury and ensure that you can complete the task without delay. Lastly, it is important to have access to a flat work area and a variety of tools.
Once you have assembled the lift, it’s time to test it out. It is a good idea to have a friend or family member join you to help you operate it. This can be especially helpful if you’re not familiar with the operation of a lift. It’s also a good idea to rinse the lift cables regularly with fresh water to avoid abrasion and damage.
You’ll also want to think about how often you’ll be launching and retrieving your boat from the lift. If you plan on taking your boat out frequently, it may be worth investing in a lift with a higher capacity to accommodate future upgrades in your vessel. If you live in a rough water location, you’ll also need to consider the durability of your lift, as it may experience more wear and tear than one in a calmer environment.
Follow the Manufacturer’s Instructions
It is important to follow the manufacturer’s instructions when it comes to boat lift installation. Not only is this to avoid potential safety issues, but it’s also to ensure the lift is able to perform as expected. Any modifications or deviations can compromise the integrity of the lift and pose a safety risk for anyone using it. If you aren’t sure of the proper steps to take, it is best to leave the installation to a professional who can handle everything safely and correctly.
Having the right size lift for your boat is another critical factor to consider before investing in one. Factors such as the size of your boat, fuel weight, additional equipment, and batteries all play into determining what kind and how much capacity you need. Make sure your lift can support any future upgrades you may want to do as well.
Proper spacing between slings or cradle beams is also crucial for proper lifting and storage of your boat. Be sure to find the center of gravity for your boat and use this information to determine where the slings or cradle should be placed on the lift. This will help to ensure your boat is supported evenly and won’t cause damage as it is moved in and out of the water.
Finally, make sure your lift is the correct width for your existing slip, if applicable. This will save a lot of time and hard work, as well as prevent any unnecessary rework down the road.
Be sure to keep a close eye on your cables for signs of wear or damage, as this could pose a serious safety risk. If you notice any issues, be sure to contact your dealer immediately.
Boat lifts are a great way to protect your boat and extend its life. They can also help to reduce maintenance costs and increase the value of your waterfront property.